Sunday, 7 September 2014

Tips For School Makeup


It's the beginning of September, which means a lot of you will be returning to school, or maybe even starting at a new school. So, I thought I'd do a post on school makeup.


I want to start by saying that I'm sure most of you who are school age don't even need to wear makeup, so please hold back from doing so if you don't need it…what's the point in smothering your face with foundation if it's already clear and imperfection free? However, I know some girls suffer with spots, blemishes or if you're in the older years then you just would like to wear a bit of makeup anyway, maybe to cover those under eye circles.


TOP 4 PRODUCTS -
Concealer is a girls best friend. Concealer can help you cover up any areas you aren't happy with, maybe there's a blemish, or uneven skin tone you want to target, and you can do this without having to slap foundation all over your young skin. A concealer like Collection Lasting Perfection is perfect for school days, it's heavy coverage so if you have spots (which we all get in our teen years….and as we get older too sadly) it will help to hide those and boost your confidence, it's also very long lasting so it shouldn't wear off over the long school day, even if you're doing P.E. For under eye circles I'd recommend Rimmel Wake Me Up, it'll definitely give the illusion that you've had a good nights sleep.
Waterproof mascara was a must have for me during my school days. I always felt a bit naked if I wasn't wearing mascara, and it always made me feel so much better about myself if I had it on. I like the waterproof versions because they tend to stay on longer, also if you get all hot and sweaty during P.E it won't smudge and go all down your face. There's loads of waterproof mascaras in the shops, but I recommend any from L'Oreal.
Face powder was something I went through quite a bit of in school. I didn't wear foundation until my last year, but I did wear a mineral powder. I liked it because it gave me the tiniest bit of coverage, which is all I needed, and it stopped me getting shiny throughout the day. Rimmel Stay Matte is great, and so is Maybelline Fit Me.
Lip Balm was in my bag at all times…actually I kept it in my pencil case! I never had a tinted one, my school was too strict for that, but I used to carry around a plain Nivea lip balm just to keep my lips hydrated.

That's all the makeup I used to wear during my school years, but if I was there now I'd probably also wear an eyebrow pencil to give my brows a little definition - Rimmel Eyebrow Pencil is my favourite. An eyeliner just to line the top lash line - I'd choose brown over black as it's more natural and not so harsh, again Rimmel is the best for eyeliners. And lastly maybe a natural matte bronzer - nothing dark, orange or shimmery, just something to give my face a little bit more colour, Soap & Glory do a fantastic duo bronzer.


I hope this post has given all you school goers some help, and I hope you aren't as self conscious as I was because honestly there's no need to be! 
x


SHARE:

Wednesday, 28 May 2014

Good To Glow


Summer is all about glowy skin. Not all of us are blessed with having that delightful natural radiance, but here's some tips on how to be good to glow -


Drink plenty of water. Health inside the body reflects on how you look on the outside. If you don't drink enough water it will show on your skin, hair and nails. Try to drink 2 litres a day, it may sound like a lot but once you get into the habit it's so easy and you will notice a difference. Hydration is key!
Exfoliate 2-3 times a week. If you have blemish prone skin don't use those nasty exfoliators with large beads in as they'll spread infection and irritate the skin, acidic exfoliating toners, like this one from Clarins, are much better. They will remove dead skin cells and help your skin to look fresh and a lot less dull.
Make sure you moisturise too, using a serum before moisturising will help lock in the goodness and you'll have baby soft skin in no time. I love Kiehl's Midnight Recovery Concentrate.
Fake it with makeup! Stay away from the full coverage foundation, yes it may be good at hiding blemishes but you don't need it smothered all over your skin, especially in the warmer months. Let your skin breathe! Let your natural skin shine through and cover any imperfections you're more self conscious of with concealer, but try and embrace how you are naturally…honestly, no-one cares and if they do then they're not worth your time or energy.
Liquid highlighters or illuminators work the best for getting that summertime glow. NARS 413 BLKR is my current obsession. You can just dab a bit where you'd like to highlight (cheekbones, down the nose, on the brow bone), or mix a little in with your foundation for an all over dewy look. Another amazing tip is to mix a bit in with body moisturiser, or dab some down the centre of your leg to create the illusion of slimmer legs…thank me later, ladies!

What's your favourite product
to help you achieve
glowing skin?
x


SHARE:

Saturday, 15 March 2014

How To Clean Your Makeup Brushes…The Right Way!


Washing makeup brushes is one of the most mundane things, but it's very important.


Why is it important to clean makeup brushes?

Not only do brushes apply products to your skin but they also pick up any oils, dead skin cells or dirt that might be on your face, so when you go to reapply makeup with the brush that bacteria will be transferred back onto your face….yucky! If you get acne or suffer from spots washing your makeup brushes regularly should make a difference. 
Keeping your brushes in good condition will make them last longer! Cleaning them regularly will keep the bristles soft, prevent them from drying out, caking together or falling apart. 
Clean makeup brushes will also apply makeup a lot better!


How should I clean my makeup brushes?

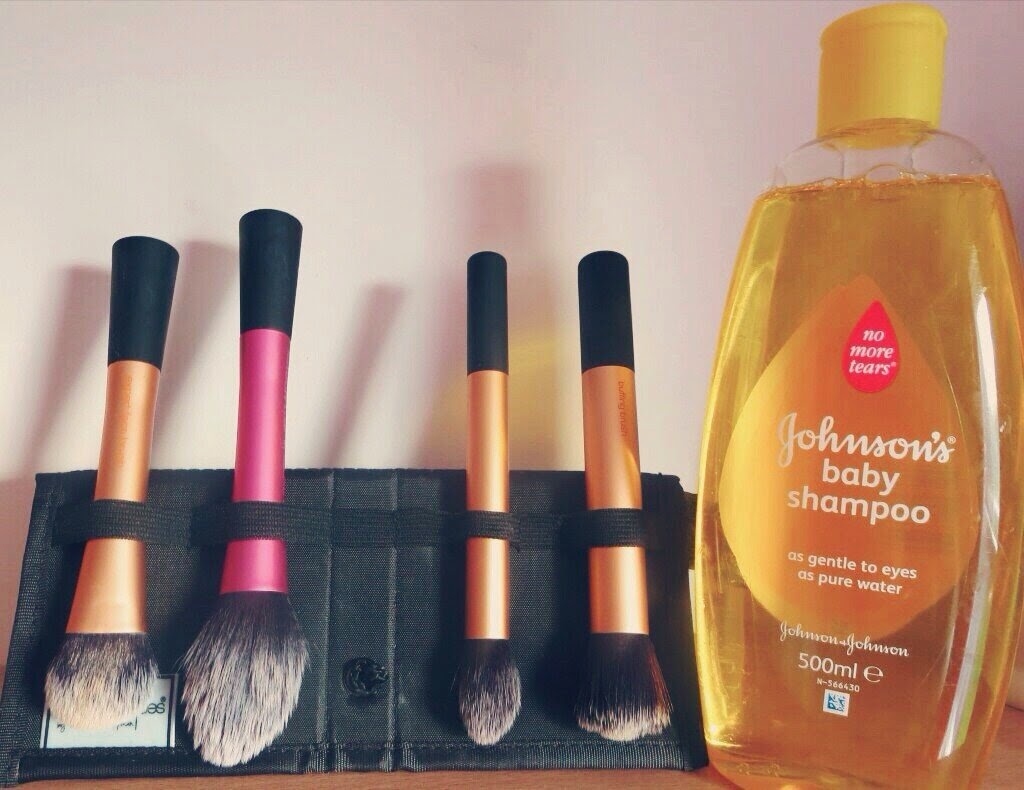
You can buy shop-bought brush cleanser from places like MAC but that can be expensive, these products can often contain alcohol as well which will make the bristles dry out. Using baby shampoo is the best option, I use Johnson's. It's nice and gentle and will do the job well. 
Firstly put the brush under warm running water, then remove it and massage some of the baby shampoo into the bristles gently, and rinse in CLEAN water! I usually repeat this twice to make sure all the product is off the brushes. Afterwards squeeze the excess water out, and place them somewhere to dry.  
This bit is important - make sure your brushes are NOT standing upright when they're drying, the water could go right into the brush and cause it to rot inside. Stand them upside down, a good way to do that is in one of the Real Techniques brush stands that come with their collections of brushes (pictured).

How often should I clean my makeup brushes?

Once a week is ideal, especially if you're using them every single day. I'd say try not to go over 2 weeks without washing your brushes. 

Extra tips

Using olive oil on your brushes before the baby shampoo will give them a deeper clean. So if they're looking extra dirty or you've used a thicker product on them this is a great thing to do. Tea tree oil is also good for this.
Reshape your brushes while they're still wet, you don't want them trying in a weird way and then you're unable to use them properly. 
Make sure your brushes are completely dry before using them again.

I hope you found this helpful!

Also, I announced the winner of my giveaway! To find out if you won 
x


SHARE:

Sunday, 23 February 2014

Bronzer & Highlighter As Eyeshadow


One of the big makeup trends for Spring is shimmery, golden, warm eyes, one of my favourite eye makeup looks! There are loads of shadows out there that will do an amazing job creating this look, but the easier option is to use your bronzer and highlighter.


I love a multi purpose product, it makes doing your makeup that much quicker, easier and if you're carrying your makeup around with you it means there's less to carry.
To create gorgeous golden eyes first apply your bronzer all over your eyelid, making sure to layer it up so there's less chance of creasing. I'm using the Nars Laguna Bronzer, which is lovely because it's so warm and matte. Bring it down along your lower lash line as well.
After you've applied the bronzer then go in with your powder highlighter over the top, this will create that gorgeous shimmer and sparkle to your eyes. I'm using the MAC Mineralize Skinfinish in Soft & Gentle, this is perfect as it's got a beautiful metallic finish.
There you have it, golden shimmery eyes - right on trend for Spring 2014!

Will you be giving this a go?

SHARE:

Thursday, 13 February 2014

Choosing Your Foundation


As foundation is the base to your makeup it's important you find the right one for you. There are lots of things to consider when buying a foundation, here are some things to help you.


The Right Formula For You

When you choose a foundation you should consider your skin type. If you have oily skin you might be best going for a matte finish foundation, or one that is oil free. Whereas if you have dry skin it's best to go for something more dewy. Also, if you have sensitive skin it's best to stay clear of fragranced foundations, mineral foundations might be a good bet.
If you have combination skin it shouldn't matter too much which finish you go for, it's down to personal preference.

Coverage

Decide what sort of coverage you'd like your foundation to have. Consider what state your skin is in, if you have blemish-free skin then you won't need full coverage, if you are blemish-prone you'll probably want medium-full coverage. Another thing to consider is the season, in winter skin tends to be in worse condition so you may want a heavy coverage, but make sure it's creamy for that dehydrated skin! In the warmer months it's a lot more pleasant to be wearing a lighter coverage foundation, and something that'll last a long time in the heat.

Finding Your Perfect Colour Match

Normally I find it quite easy to colour match myself - applying on your hand isn't really a good way to judge a foundation shade, your hands tend not to be the same shade as your face. Apply a little tester amount to your neck, blend down and if the colour disappears it's a good match for you.
At highend makeup counters it may be more difficult to colour match yourself, sometimes they don't have samples out, perhaps there's much more choice so you can't decide, or maybe you're in MAC and are confused with the N's and C's (N means warm - best for pinkish skin, C means cool - best for yellow or olive toned skin) - If this is the case then ask for help. There'll be someone who works in the store to help colour match you perfectly. Something important to consider is a lot of foundations will oxidate, which means they can get darker after they've been on the skin for a while, so it's best to go away for a bit and see if this happens before purchasing your product.

SPF or No SPF

For an everyday foundation SPF is always a good idea, most foundations will have an SPF in them but it's always good to check. If they don't then make sure your moisturiser does!
However, if you're looking for a foundation for nighttime use only (going to clubs, parties, dinners) then an SPF free foundation will photograph better - you won't get that ghostly white face SPF gives you with flash photography.


I hope you found this post helpful!
Happy foundation shopping!
x

SHARE:

Friday, 7 February 2014

How To De-puff And Brighten Your Eyes


We all have those days when we wake up after a not so great sleep and our eyes look tired, puffy and not how we'd like them to be, but fear not, I have some tips on how to prevent those under eye circles and some tricks on how to make them go away!


Prevention

I'm sure we'd all just prefer to never have puffy eyes again, unfortunately that's not likely, but there are some things we
can do to prevent it from happening so often.
1. Get a good nights sleep! Sounds obvious, and well…it is, but it's really effective. Go to bed early, make sure you're relaxed and have that 8 + hours you need. If you're not sleeping enough your eyes will most probably look dull, red and tired. Another tip is to sleep with your head slightly elevated, this prevents puffiness.
2. Eat well! What you eat and drink really does effect your body, including your eyes. Food that is high in sodium (cheese, marmite, popcorn, salt, etc), carbs (pasta, bread, cakes, etc) and fat can make you retain water, which causes your eyes to become puffy. But protein like fish and tofu is really good.
3. Stay hydrated! Eyes tend to become puffy due to water retention, which is caused by excess salt in and around the eye (this is why when you cry your eyes go puffy). Making sure you drink plenty of water throughout the day is good for reducing eye swelling and will keep you hydrating, but downing a huge glass of water before bed might cause the opposite effect as your body will retain that water until you wake up. Try drinking a green tea after your evening meal, it's good for your skin and good for your eyes, and keep away from drinks that dehydrate you (caffeine and alcohol) and salt!
4. Exercise! This improves circulation around your body.

De-puff

1. Cold cucumber slices! Apply the cold cucumber slices to your eye, leave for 3 minutes and then repeat with fresh slices a few times. The coolness will soothe the eye and help to de-puff. Cucumber also contains several vitamins and acids that will help reduce water retention.
2. Cold, raw potato slices! If you can't stand the smell of cucumber (like me) then potato is a good alternative, it will do the same job as the cucumber.
3. Frozen spoon! Place a spoon in the freezer the night before, then when you wake up simply apply the cold spoon under your eye for 30 seconds each.
4. Raw egg whites! Separate the egg white from the yolk of one egg and apply the egg white directly under the eye using some tissue or cotton wool, leave it to dry for a couple of minutes - under your eyes will start to feel quite tight, then rinse off the egg white. Your eyes will look less puffy and the nutrition in the egg will also help reduce water retention. You can also use cold milk!
5. Cold tea bags! You can use either caffeinated tea bags - caffeine helps reduce the swelling, or you can use herbal/green tea bags - these contain anti-inflamitary and anti-irritants that will really soothe your eyes. Soak the tea bags in hot water the night before, then place them in the fridge overnight, in the morning make sure you squeeze out any excess water and then place them on your eyes for 3-5 minutes.

Make-up

Using the right makeup can really help you to look more wide awake and diminish those pesky dark circles.
1. A good concealer will become your best friend! Opt for a concealer that has a peachy or yellow tone to at, this will cancel out the purple or blue hues and brighten the area. Make sure your concealer is nice and creamy, you don't want anything drying!
2. Don't go heavy with eyeshadow, dark eyeshadows can make you look more tired, go for light, brightening colours, but by all means go in with lots of mascara to widen your eyes.
3. Create an illusion of bigger eyes, just like you can highlight your cheekbones, you can highlight the right areas of your eyes to make them stand out, appear wider and more awake. Use a lighter colour eyeshadow with shimmer and apply it to the middle of your eyelid and the inner corner of your eye - this will really make your eyes look more awake and alert. Using a white eyeliner on the bottom lash line will also help.


If you follow those tips you'll have beautifully awake, de-puffed, bright eyes in no time!

Hope this helped you!
x


SHARE:

Wednesday, 11 December 2013

Keeping Your Lips Soft This Winter


Winter brings cold temperatures, strong winds and other harsh weather that is not great for our skin.
Chapped lips are a problem most of us experience during this time, due to the skin on our lips being much thinner and more sensitive than the rest of the skin on our face, and they can be rather sore, annoying and let's face it, not attractive at all.
Here are some tips on how to avoid those dry lips!


Lip Balms
Every lip balm out there will promise you soft lips, but not all of them will give you that.
Here are some things to watch out for! When buying a lip balm have a look at the ingredients, you need to AVOID menthol, camphor and phenol - all of these will give your lips that cooling sensation and they will feel soothed, but in the end all it'll do is dry your lips out even more. Artificial fragrance is bad too, they just suck the moisture right out of the lips, same with salicylic acid. Instead of these LOOK OUT FOR hemp oil and jojoba oil, these too oils will will treat your lips and absorb moisture, so will coconut oil. Beeswax and cocoa butter are two ingredients that will give your lips the moisture your after, without causing any unwanted longterm dryness. Lanoline is another great ingredient!
PRODUCTS TO AVOID - Carmex has a great reputation, I used to use it all the time and loved it for a while but after a few months I noticed it was doing nothing for me and was drying my lips out. I looked at the ingredients and bam….I see menthol and camphor, as mentioned before, these ingredients give your lips that amazing cooling sensation but actually it does them no good. Vaseline is one of the other big sellers that is no good, it contains petroleum which acts as another layer over the skin…you think this is good but it isn't. It slows cellar renewable, meaning your lips can't repair themselves as well, it also traps toxins under the skin, and your lips will become dependant on it, so as soon as you stop using the product your lips will become unbearably dry.
AMAZING PRODUCTS - My favourite lip balm, and definitely a great bargain buy is Burt's Bees - I use the mango one because it smells lovely. Burt's Bees contains coconut oil and beeswax to help absorb moisture, lots of vitamins and other ingredients that are great for keeping your lips soft. Kiehl's lip balm is another good option! Clarin's moisture replenishing lip balm is great but pricey, although not as pricey as ByTerry Baume de Rose (£35) but another excellent product, going by the ingredients.

Exfoliate
Exfoliating your lips a few times a week, either with an old toothbrush (make it slightly damp and massage onto the lips) or with a lip scrub (like from Lush) helps to buff away old, dead skin cells.

Makeup
Instead of using normal lipsticks opt for extra moisturising products like Revlon lip butters - they'll give you a nice colour, but won't dry out your lips. Or use a gloss which will help to protect your lips against the cold weather.


Don't lick
Licking your dry or chapped lips will just make them worse! Salvia contains enzymes that will break the skin, also salvia evaporates which will just cause the skin to become more dehydrated.

My two last tips are to take vitamin supplements, and quit smoking. Yep, smoking dries out the lips massively and can cause the skin to break. Yucky!


Hope you found these tips
helpful!
What's your favourite lip balm?
x
SHARE:

Sunday, 17 November 2013

How To Make Your Lipstick Last Longer


I'm a big lipstick lover, but something that can really annoy me about lipsticks is having to touch them up when they start to fade…especially the bolder colours! But I have come across a few ways to make your lipstick stay put much longer.


What You Will Need 
- A toothbrush, preferably an old one so you don't ruin the bristles
- A lip balm
- A concealer or foundation
- A lip liner
- A lipstick
- Face powder
- Powder brush
- Tissue

1. The first step is to exfoliate your lips. You can use lip scrubs such as the one from Lush, but to save money just get an old toothbrush, damp it with some water, and scrub at your lips to remove any dead skin.

2. Use a lip balm to moisturise your lips to prep them for lipstick. I'm using the Nivea essentials lip salve. I do this before doing my makeup, then after I've finished everything but lips I wipe away any excess lip balm.


3. Blot some concealer or foundation (trust me) onto your lips. It will act as a primer for your lipstick. Make sure you blend it in.


4. Use a lipliner similar to the colour of your lipstick of choice to outline your lips. Make sure to blend it softly so there's no definite line once you apply lipstick. This lip liner is Rimmel's lasting finish 1000 kisses lip liner in 061 Wine.


5. Apply your lipstick! I used Kate Moss for Rimmel in 107.

6.  Place a layer of tissue over your lips, and use a brush to apply some loose or pressed powder onto your lips through the tissue. The tissue helps to make sure only a very thin layer of powder goes on, but it's enough to set the lipstick in place. 


7. If you need to add a bit more colour after using the powder go in with another layer of lipstick. 

BONUS TIP -
If you're using a bright lip colour and you're worried about it getting onto your teeth then put your finger in your mouth, make an 0 shape with your mouth, then slide your finger out of your mouth.
Any lipstick that was on the inside of your mouth, and bound to get into your teeth, has now been removed and is on your finger.
SHARE:

Friday, 15 November 2013

The Budget Buy Brow Kit


Brow's are such an important part of a beauty and makeup routine. Whether you believe it or not brows make such a difference to your face, shaping and shading can help balance your facial features, frame the eyes, and if you're a little bit older they can even give you a more youthful look if done correctly.
The problem is eyebrow kits can be expensive, but I have found a brilliant kit that's so affordable!
Welcome, Fashionista Brow Kit.


I've been using this brow kit for a year now, so that's why it may look a little messy but you can see I use it daily! And I still haven't hit pan. Win!


In this kit, which is a brilliant size for popping into your makeup bag (it's a bit bigger than the palm of my hand) contains 3 brown shades - a very dark one, a medium one and a light almost orangey brown. There is also a wax to set any powder into place. As well as that you get a little double ended brush which I don't use whilst doing my makeup but is fine for on the go touchups, and also a little pair of tweezers which too are good quality. And of course that all important mirror, which is a great size.
The powders themselves are well pigmented, not chalky, don't give any fall out and stay in place on my brows all day even without the wax. I tend to use the medium brown, sometimes I mix in a bit of the darker one too and the colour is great.
I think unless you have black eyebrows or very fair hairs then everyone could make this work for them, whether it's by using a shade on it's on or mixing them.


This kit is £7 from Superdrug, or currently £3.50 HERE!
SHARE:

Sunday, 30 June 2013

My Top Skincare Tips

I've always looked after my skin, I like to have clean and moisturised skin. I hate the feeling of my skin feeling clogged up or dehydrated. I don't have perfect skin by any means, I get the occasional breakout like everybody else, but my skin is quite good and that's because I do take care of it, so I thought I would share with you my top skincare tips.
(please note, I am not a professional nor an expert, these are just things I have picked up and things that work for me, a lot of these tips are just common sense)


1. ALWAYS remove your makeup before bed. Not removing your makeup before bed will mean your pores get clogged up, which is the main cause for skin imperfections. Your skin needs time to breathe, during the day it's been covered in makeup or faced with outside pollution, it needs a break!
A lot of people say "your skin mends itself at night', that is complete rubbish. Your skin is repairing itself 24/7, but at night when your asleep it doesn't have makeup, pollution or sunlight on it, so it can focus on repairing.

2. DON'T use makeup wipes. I think more or less everybody I know uses makeup wipes, and I used to until about 10 months ago, and the difference I have noticed in my skin since I stopped has been amazing. Makeup wipes contain alcohol, which dries out the skin and if you have sensitive skin they will make her skin more red. Alcohol will also strip the skin, and is a breeding ground for bacteria. Stick with a non-foaming cleanser, much better for your skin and actually takes your makeup off better. Also, if you wear makeup during the day remember to double cleanse at night.

3. DO watch what you eat. About 99% of what your face is showing comes from what you eat. Basically, cut out the crap. Fast food, chocolate, sweets, microwavable meals - all are not good for your skin and if you cut them out you will notice a big difference. Cut down on dairy, so many people I know who have had problem skin and cut out dairy noticed a huge change - humans are the only species that eat and drink milk that comes from another mammal, it's not a natural thing to do.

4. DO cleanse in the morning. Washing your face in the morning is very important, you may think "but I have just been laying in bed all night, and I cleansed before bed, I don't need to do it again"…so you think bacteria doesn't breed whilst your asleep? You don't sweat? Then why do you ever change bedsheets if that is the case?

5. DON'T smoke. Like I said earlier, it's just common sense. If you smoke it decreases the amount of oxygen in your skin, not to mention the amount of rubbish you're breathing in. But hey, I guess smokers care more about cigarettes than they do for their health and skin.

6. DO take supplements. Obviously this is not crucial, but if you have problem skin I'd recommend taking some supplements that contain fish oil and/or zinc, both are brilliant for the skin.

7. DO use acidic skincare. That sounds quite scary, but acids are very good for the skin. A lot of toners will have acid in, the one I use the Michael Todd Blue Green Algae Toner which contains Hyaluronic acid which helps with cellar renewable (review here). Another brilliant one if you can afford it is Clarins Gentle Exfoliator Brightening Toner.
A toner should be an essential in your skincare routine.

8. DON'T use exfoliators with beads in them. These spread infection.

9. DON'T use sudocream. I know so many people use this, and I have been known to. Yes it does reduce inflammation, but in the long run it clogs pores and just sits on the skin.

10. DO invest in skincare. Now, I know not everyone can afford high end skincare, and I am one of those people. But if you are willing to spend money on clothes or accessories then why not spend it on skincare instead? You only get one face, look after it. Ideally you should have two moisturisers, and two cleansers - one each for morning and night time use.

Product everyone should own - Hydraluron Moisture Booster (I do not own this myself but I am saving up, skincare experts have said everyone should own this - hyaluronic acid can absorb up to 1000 times its weight in moisture, so if you put this on and then your moisturiser then the moisture will stay there. It also helps heal the skin, reduce bacteria, and softens the skin)

There you go, my top 10 skincare tips. I guarantee you if you do those things you WILL have better skin. I hope you found this helpful.

Will you be trying any of these things out?
x
SHARE:
© Amelia Rose . All rights reserved.
Blogger Templates made by pipdig